However, despite the fact that many of us use Finder almost every time we need to ‘find’ something on our machine, we generally fail to use it efficiently (or to its fullest extent). We hope to change this through this listicle that includes some of the essential Finder tips you must practice to get more out of Finder and, in turn, your Mac.
Finder Tips and Tricks
1. Change the Default Finder Folder
Even though Finder allows you to navigate through different files and folders on your Mac, all in one place, if there is a particular folder that you need to visit every-now-and-then, the best way to work efficiently is to set this folder as the default Finder folder. Once set, every time you open Finder, you will always land up in that folder. To set the default Finder folder, open Finder, go to Preferences [command + ,], and select the General tab. Here, click on the drop-down menu below New Finder Windows show, and select your folder. If it does not appear upfront, tap on Others and select the folder from there.
2. Customize the Finder Toolbar
One of the best things about Finder is that you get a bunch of accessibility and files/folders-specific functionality options in the toolbar. Using which, you can perform a range of operations with ease, without having to go into the menu every time. To add to that, Finder also allows you to customize the pre-listed options in the toolbar to suit your liking and purpose. For this, you need to first open Finder and right-click [control + click] on the toolbar. Once done, select Customize Toolbar from the list of options. From here, you can now add actions by clicking on an item and dragging it to the taskbar. Similarly, you can drag-off a pre-listed item from the toolbar to remove it. When finished, hit Done.
3. Add Shortcuts to Finder Toolbar
Much like how you can customize the toolbar to add/remove actions as per your requirements, Finder also offers the ability to add shortcuts to the toolbar for quick access. These shortcuts can be anything from applications to files, to even folders — basically, anything that you need to access regularly can be added to the toolbar. To add a shortcut, command + click an item (file, folder, app) and drag it to the toolbar. Further, if you need to remove an item, command + click on it, and drag it out of the toolbar.
4. Enable File/Folder Path
When you get started with Mac, the option to view the file or folder path is disabled by default in Finder. However, Apple does provide an option to turn on the feature. Called path bar, the feature is located at the bottom of the Finder and gives you the specific path of a file or folder. And, in turn, makes it easier for you to find your current path in a directory. Not to mention, it can particularly come in handy at times when you need to locate items within the Library. To enable path bar, open Finder and go to View > Show Path Bar. Alternatively, you can also use the shortcut [option + command + p] to enable the feature.
5. Access the Library folder
Similar to how Apple has the path bar feature disabled by default, it also hides the Library folder in Finder to keep the average user from fiddling around with the system files, which seems reasonable since the Library folder holds a host of settings, resources, and support documents for the system. While there are different ways to access the Library, one of the safest bets is to open finder, hold down the option key and click on Go > Library. Once done, drag the Library folder and add it under Favorites in the left-hand menu (sidebar).
6. Merge Finder Windows
At times when you have multiple instances of Finder, for different files and folders, open at once, you might have noticed that it can be quite a task to keep a tab and work around with multiple windows. So to simplify this situation, Apple has a hidden option in Finder that allows you to bring together all the different instances of Finder in a single window. For this, you need to open any active Finder window and go to Window > Merge All Windows. Once done, you should see all the windows appear in the form of tabs in a single Finder window.
7. Show the Status Bar
The status bar is yet another option that is surprisingly disabled by default in Finder. For those unaware, the status bar is located at the bottom of the Finder and offers two crucial pieces of information: number of files in a directory and total available storage space on your Mac. As a reason, enabling it saves you a few extra steps that you would otherwise have to perform to view these details. To enable the status bar, open Finder, and head over to View > Show Status Bar. Alternatively, you can also use the shortcut [command + /] to enable/disable it.
8. Enable File Extensions
While we are enabling different options in Finder to get a glance at the essential details about a file or folder, enabling file extensions is another such option that can save you the hassle of going into info for every single file. For this, open Finder and go to Preferences [command + ,]. Select the Advanced tab and tick the checkbox that says Show all filename extensions.
9. Rename Multiple Files
When you have a mammoth of files to rename on your Mac, images/videos, in particular, it can be an arduous process to go about renaming every single file one-by-one. However, with Finder, you can rename multiple files at once with just a few clicks. For this, select the files you want to rename and right-click on an item. Here, select Rename x Items from the different listed options. Alternatively, you can also automate the process by using Automator [Guide on how to rename multiple files using Automator].
10. Quickly Share Files From Finder
If you are into Apple’s ecosystem and have multiple Apple devices such as the iPhone and the iPad, you can use the AirDrop functionality to share files between these devices. Talking about which, when it comes to sharing files from a Mac, you can do so using Finder. For this, open Finder and go to the directory of the file you want to share. Next, select it and hit the share button in the toolbar. Once done, you will see a bunch of options, select AirDrop.
11. Show Items on Desktop
By default, your Mac does not show items like the storage drive or connected disks, devices, and servers, when you first get started. As a result, you have to open Finder and navigate your way from there. However, to make these items easily accessible and save a few extra steps in the process, you can show select items on your Desktop. For this, open Finder and go to Preferences [command + ,]. Here, choose General and tick the checkboxes next to the items listed under Show these items on the desktop.
12. View Image Metadata in Finder
If you want to know more details about an image, like the device it is shot on, lens used, aperture value, exposure value — essentially all the metadata, you can do so on Finder by enabling preview. To do this, open Finder and go to View > Show Preview. Next, select an image, right-click on it, and choose Show Preview Options. Here, under Show info, tick the checkboxes next to the values you want to view upfront in the preview. Once enabled, tap on an image to view its metadata in the preview section.
13. Use Quick Look in Full Screen
Quick Look is a quick utility that allows you to take a peek at the contents of a file without having to open specific applications to view them. When it comes to images, you can select multiple files at once and run them in a full-screen slideshow. For this, select the images you want to preview and hit option + space. Once in, you can then move between the images using the arrow keys, and exit by pressing esc.
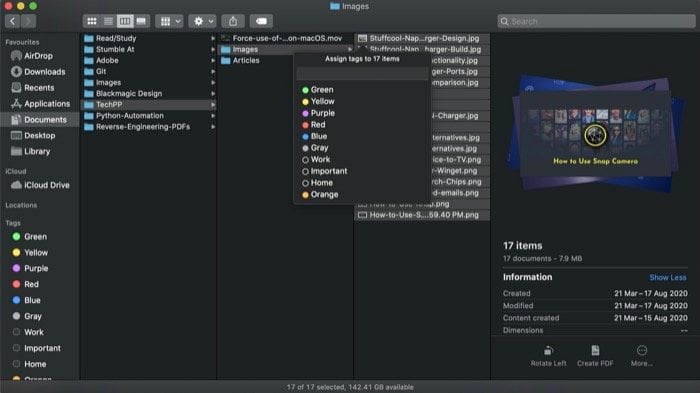
14. Add Tags to Documents
One of the many useful features on Mac when it comes to organizing files and folders is tags. A tag is essentially either a color code or a label to help you organize all sorts of files on your machine. For instance, you can create a tag ‘work’ that can be used to label and organize the work-related documents in one place, which makes these files easily accessible. To add a tag, select a file and right-click on it. Next, select a color from the list to assign it to the selected file. If you need to create a new tag, choose Tags from the list of options and give a name to the tag. All tags can be accessed in the left sidebar, and you can go into each one of them to view all the relevant files. To delete a tag, simply right-click on it and select Delete Tag.
15. Customize the Finder Sidebar
The sidebar in Finder, located on the left-hand side, offers quick and easy access to different locations in your machine’s storage. From here, you can access AirDrop, different folders, iCloud Drive, and other locations straight from the menu under Favorites. So, if there are certain directories on your Mac that you need to open now-and-then, you can add them to the Favorites and access them with a single click from the sidebar. For this, locate the folder you want to add to Favorites and click and drag it under Favorites. To remove the folder, right-click on it and select Remove from Sidebar.
16. Lock a File/Folder
If you have ever been in a situation where you have accidentally deleted or moved a file or folder on your Mac, you will be delighted to know that, with Finder, you can lock files/folders to prevent them from being accidentally moved or deleted. To lock a file/folder, right-click on it and select Get Info. Here, under General, tick the checkbox that says Locked. Once done, if you try to move or delete a locked folder, you will be prompted to confirm your action.
17. Compress Files
While there are certain applications for Mac that allow you to compress/decompress files to create an archive and save some space, the built-in utility offered by Apple works fine for most use-cases. It uses the ZIP format, which is a lossless format for file compression. To compress files in Finder, select all the files you want to compress and right-click on an item. Now, from the list of options, select Compress X Items. To decompress a file, just double-click on it to see the contents.
18. Use Quick Actions
Much like how Finder allows you to compress files using the built-in utility, it also gives you a bunch of other actions, such as rotate, edit, create PDF, and more, that you can use to make quick changes to a file. For instance, you can create a PDF by simply selecting the files you want to include and right-clicking on them and going into Quick Actions > Create PDF. Similarly, you can also rotate images or perform basic editing. Moreover, if you use Automator, you can execute your custom services from within Quick Actions.
19. Quickly Create a New Folder with Selected Items
The process of copying items from a folder and creating a new folder with those items involves a few steps. In general, most of us proceed by first making a selection of items, creating a new folder, and then pasting the items to the new folder. However, Apple has a neat alternative solution for the same that makes the process easy and saves a few extra steps. For this, first copy all the items you want to group together, right-click on it, and select New Folder with Selection. Next, give a name to the folder and hit return. If you need to move the folder to a different location, simply drag it to that location.
20. Jump to a File Path in Finder
If you have used Windows at some point in time, you would be aware of the breadcrumb trail in the navigation bar, which makes it easy to jump to a different file path from anywhere in a directory. In macOS, although you do not have a similar trail, you do get the option to switch between a few key locations on your Mac. For this, in a Finder window, right-click on the current directory to reveal the different accessible locations. And from this list, select the one you want to visit.
21. Use Smart Folders
Smart Folder is another useful feature on Mac. It allows you to organize all the different files and folders on your machine in a single folder to make them easily accessible whenever required. To create a smart folder, open Finder, and go to File > New Smart Folder. Next, enter your query in the search box and set criteria to filter out the results. [To know more about Smart Folders, check out our detailed guide Smart Folders and some of the essential Smart Folders you must use on your Mac.] That’s all. Those are some of the essential Finder tricks to help you get more out of Finder. These tips can help you navigate better through files and folders and also make your workflow more efficient by allowing you to leverage different macOS functionalities.